
Jump Ahead To:
BEST KAYAK ANCHOR TROLLEY: INTRO
Staying stable when anchoring yourself in kayak is a challenging feat. Using a kayak anchor trolley, particularly the Best Kayak Anchor Trolley, takes away the pain and makes anchoring positions more adjustable. By the way, don’t worry if you aren’t familiar with kayak anchors, we have ranked The 5 Best Kayak Anchors for you!
Let’s find out why this is an essential piece of kayak fishing gear for fishermen of any level of skill or experience! Not familiar with Kayak Anchor Trolleys? Make sure you take a look at our Ultimate Guide!
Best Kayak Anchor Trolley – Overview:

Please note: This post contains affiliate links. An affiliate link means that we may earn advertising/referral fees if you make a purchase through our links.
Most people don’t know much about kayak anchor trolleys. And they seem way too confusing to install on their own. But I’m here to change that attitude! Below, I’ve compiled a guide that explains everything you need to know about anchor trolleys so that you can be up and running in no time!
To make reading easier, I’ve divided the guide into sections. First, I’ve explained the basic setup of kayak anchor trolleys – what they are, what they are used for, what kinds of pieces they are built of, why they are important for kayak fishing, and so on. The setup may be different in your particular kayak anchor trolley, but we will go over the general rules. Always read the manual to make sure you’re anchor trolley doesn’t have any unique requirements!

In the next part, I have explained how to use a kayak anchor trolley – after all, even having the Best Kayak Anchor Trolley isn’t going to do you much good if you don’t know how to properly use it! In the third section, I’ve jotted down important features you need to consider before buying an anchor trolley. This includes all the parts you need and the type of cleats. You’ll quickly become an informed consumer and you’ll be able to separate the “good” kayak anchor trolleys from the “rest” very quickly.
Finally, I’ve provided a link to what I am certain is the Best Kayak Anchor Trolley. You’ll see how it fits everything I mentioned in the previous section. I’ve summarized my thoughts in the ‘My Experience’ section. By no means is it the ONLY high quality kayak anchor trolley, but you’ll quickly see why I think so highly of it!
Side Note: If you are looking for a “traditional” kayak anchor, please check out our guide on the 5 Best Kayak Anchors, an extremely helpful review!
So let’s get started with the guide!
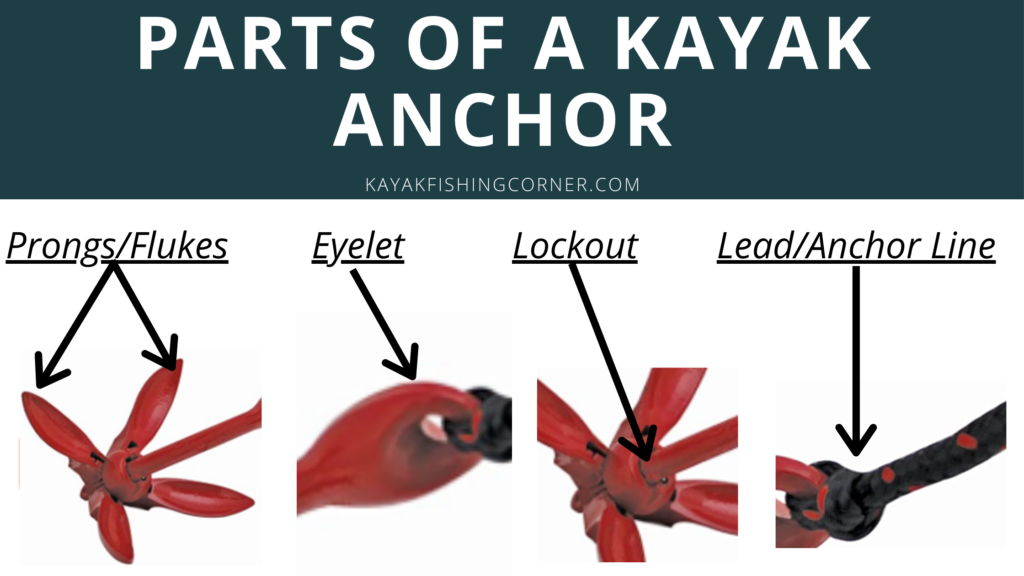
Parts of Kayak Anchor
Best Kayak Anchor Trolley – Basics:

Please Note: As an Amazon Associate, I earn from qualifying purchases.
Shortcut to the Best Kayak Anchor Trolley Review
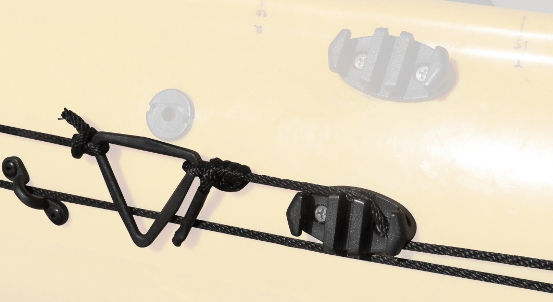
A kayak anchor trolley is a system of ropes and pulleys that holds the anchor line in place. It can have multiple applications, depending on how it’s designed, all of which are helpful to kayak fishermen of any level of skill or ability.
Anchor trolleys are mainly used for three purposes. Firstly, they allow you to position your anchor depending on the wind and currents. This is done by changing the position of the tether or carabiner, using the pulleys. The cleat helps to lock the position in place.
Secondly, it keeps the anchor line free from tangles and disturbances. You can do the same with anchor cleats. But if you’re constantly changing positions, you’ll need to install the cleat in every favorable position.
Thirdly, a kayak anchor trolley stops your kayak from swaying. It grounds you to your anchor line, and the kayak won’t be moving with the currents. You can see why each of these features is tremendously helpful for kayak fishermen!
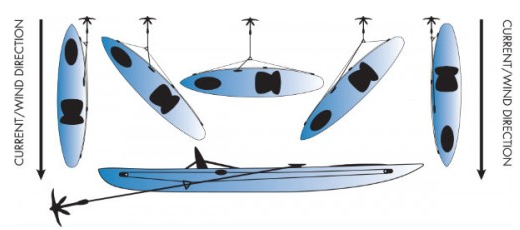
Anchor trolleys are highly recommended for people who go kayak fishing, but they are highly recommended for kayakers of all types! You need to use an anchor to stay in one place – you already know that. But wind and tide and your clumsy body can disturb the anchor line. An anchor trolley makes the system highly stable and keeps everything in place!
Side Note: Another kayak fishing accessory that will help protect you from strong winds and currents is known as a “kayak outrigger”. You can learn how to use kayak outriggers before checking out our post on the before learning about the 5 best kayak outriggers on a KFC sister post!
How to Use the Best Kayak Anchor Trolley

You first need to identify the parts. Remember, you MUST be careful to avoid accidentally discarding any of the (sometimes) small pieces that come with the anchor trolley kit. The manufacturer’s manual usually states which part is what, often times using an alphabetic or numeric identification system. Once you identify the parts, here’s how to install the anchor trolley:
- Place your kayak on an elevated place, preferably a table, to get some decent working space.
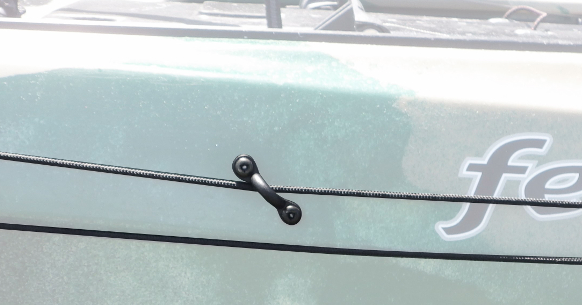
- Start by placing the pad-eye on the kayak above the waterline and approximately 8 inches from the rear of the kayak (the stern).
- Mark the holes of the pad eye and use an 8.5 mm drill bit to drill the holes.
- Next, insert the well nuts inside the holes you drilled.
- You can use some sealants to fasten the nuts further. We suggest that you do this to ensure a long lasting bond.
- Place the pad-eye over the nuts and bolt it down.
- Repeat the same steps for the other side of the boat.
- Tie the shock cords to the pad eyes and hand the pulleys from them.
- Run your rope through the pulley each pulley, creating a “circle”. It will actually look more like an oval, but that’s OK!
- Where the two ends of the rope meet, tie them to the carabiner.
- Pass your anchor line through the carabiner.
- Now your anchor trolley system is ready for use!
If you want to remove the trolley system, here’s how:
- Pull up the anchor (this will be your work out for the day, depending on the weight of the anchor, of course) and pull out the anchor line from the carabiner.
- Untie the rope from the carabiner, then remove it from the pulleys.
- If you want to remove the pad eyes as well, you will need to unscrew the bolts.
Please Note: The installation and removal process will require some special tools (screwdriver, wrench, etc.). Because of this, and because these tools, unlike your kayak fishing paddle when using a kayak paddle holder, can easily be dropped overboard and lost to the bottom of the water, we suggest that you ALWAYS install and remove when on dry and flat land!
Best Kayak Anchor Trolley – Important Features:

Components Needed:
There are a few components you should look for in an anchor trolley set. The first thing you’ll need is the cord. It is the main trolley for your anchor. Next, you’ll need two pad eyes, one for each side of the kayak. These are where you tie your pulleys. You’ll need one pulley for each pad eye and some shock cord.
Aside from that, the middle of the trolley has a carabiner. It is a stainless steel hook that can open to be detached. The anchor line goes through the carabiner. Make sure you get a kit that has a carabiner made of quality components (i.e.: metals, not plastics).
You will also need components to fasten the system in place. This means you need 4 well nuts with stainless steel bolts. These are what you use to fasten the pad-eyes. You will also be need a drill, preferably one with an 8.5 mm drill bit. It doesn’t need to be an expensive drill, just something that has a reasonable amount of power. A common household drill will work just fine.
The drill obviously won’t be included with the kit, but you should have one at hand. Some kits may include the drill bit only that’s suited for the well nuts. You can install this drill bit in your drill if you have an adjustable drill. Just make sure to read the your drill’s owner’s manual, particularly the section on changing drill bits! Once you’ve done it one time, you’ll see that its nothing to be intimidated about.
You can also find kits that have included “zig-zag” cleats. I don’t know if this is the correct term or not, but when you see this kind of cleat, you’ll know what I mean!These are the best for fastening trolley lines and to prevent them from getting tied.
Material:
Good materials not only make the system last longer but also add more weight threshold. Most, if any, metal parts should be made of stainless steel. It is because stainless steel is rust-resistant, which is a requirement for anything related to fishing kayaks, as they’ll constantly be exposed to wet conditions!

As for the shock and main cords, there are several options. Nylon and polypropylene are the two most commonly used materials. Polypropylene is the best choice for use in fishing kayaks, as it is waterproof and doesn’t rot in the water. Plus, polypropylene floats, making it easier to retrieve, in case, it floats away. The last thing you want is your cord (or rope) to sink to the bottom of the water at an inopportune time!
However, polypropylene is highly prone to UV damage, which is a big consideration when used outdoors. In that respect, nylon seems to be the better contender. Plus it’s made stronger than polypropylene. However, water and other liquids can weaken nylon, so it may not last as long. Like everything else in life, finding a balance that accounts for your needs is critical.
Some ropes may be made from polyester. It is the jack-of-all-trades. It’s resistant to chemicals, UV rays, and even water. However, they are harder to find in kayak anchoring systems. Let us know if you find a polyester style anchoring trolley kit so we can take a look!
Type of Cleat:
A cleat isn’t something that is included in every kayak anchoring trolley. But it’s nonetheless an important part of kayak anchoring. And most anchor trolleys features cleats as an accessory.
Cleats are small pieces of metal or wood that hold the main cord in place. They keep your cord stable, so you can lock your anchor line in one position. Cleats allow for more precise anchoring. You see them on all sorts of boats and docks too, large or small, even large cruise ships are “moored” (tethered) with using cleats!
They come in a variety of shapes. The most popular one is the zig-zag cleat, like we mentioned above. In this, there are 3-4 ridges in the cleat. Run the rope through them in a zig-zag fashion, and it won’t move from its spot.
Then there’s the clam cleat. These cleats fasten the rope in one direction, kind of like a one-way valve.
Buy the Best Kayak Anchor Trolley:

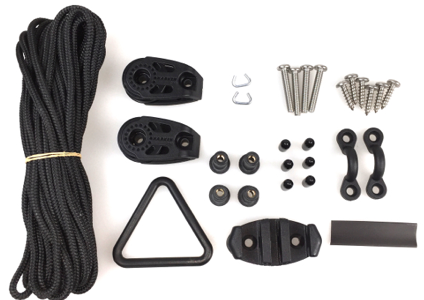
Of all the kayak anchor trolleys I’ve tested, the one that I have decided to showcase in this article is truly the Best Kayak Anchor Trolley. It comes with all the hardware included, a nice plus for those of you who aren’t looking to make another trip to the hardware store!
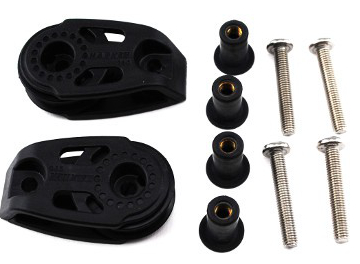
It includes 30 feet of nylon rope, two pulleys, two pad-eyes, and one triangular carabiner. The kit also includes 4 bolts, 4 well nuts, and 6 screws. Aside from that, you also get a “zig-zag” rope cleat, which, in my opinion, is the best type of cleat for consistent and secure kayak anchoring.

Firstly, let’s talk about material quality. This trolley includes a nylon cord and pulley system. As stated in the buying guide, nylon is a highly strong material that can resist UV damage and corrosion. However, it is slightly less waterproof and can become weakened with water damage. But there are 30 feet of the rope in this kit, so you can replace it at least one time if you have a shorter fishing kayak.
The pulleys are signature pulleys. The manufacturer of the pulley is a third-party manufacturer of sailboat and kayak parts. These pulleys are the best for their easy installation and high durability. They’re also known for their low-friction working. These particular pulleys are the best choice here, even if you replace the rope.

Each metal component is made of stainless steel. This set also comes with a “zig-zag” cleat, which is the best type of cleat. It works to hold the ropes steady to prevent your fishing kayak from swaying, which is the whole point of a kayak anchor trolley system in the first place.
What I like the most here is that the Best Kayak Anchor Trolley comes with the installation manual included. Can you believe that this is not the “norm”? Some companies simply send you the kit, without instructions!!! Remember, every kayak anchor trolley kit is just a bit different than the next, so you’ll want to follow the item specific instructions. It includes information on how to set up the trolley, identifying the parts, and using it!! Between the manual and this article, you will be abundantly prepared!
The carabiner used in this set is triangular rather than the usual hook shape. It isn’t an issue, except the traditional carabiners allow you to remove one knot with ease. Here you will have to untie the knots yourself. Not that big of a deal, but something to be aware of, as the knots can get very tight sometimes. We suggest keeping a very small, (roughly 1mm) screwdriver handy, as this will help you unwind any difficult knots!
My Experience

Deciding upon the Best Kayak Anchor Trolley was very easy for me – I knew that I needed a kayak anchor trolley to become a better kayak fisherman, and I knew that the model needed to come with the “important features” I highlighted for you above!
It comes with not only the main components but also accessories and even some spare screws. And the cherry-on-top is the manual to install and use everything. This proves that the anchor trolley was built by kayak fishermen, for kayak fishermen, and the extra parts is truly an example of going above and beyond!!

The rope is tight and strong. It didn’t rip the entire time I used it. However, since it is nylon, I’m assuming it won’t last for multiple kayak fishing seasons. I’m not using it in harsh currents, so little to no water splashes on the rope. Replacement ropes aren’t too expensive, so I will continue to “run the risk” for as long as I can!
My only other concern is the carabiner. It’s not the MOST convenient design, but I can handle it given that the rest of the materials are wisely designed and of good quality. The “zig-zag” cleat has helped to make the anchor trolley stable and prevent my fishing kayak from swaying, which is great for when I am encountering a strong wind or heavy current! My kayak stays in place, and I can fish in peace in my desired location. Great for me, not so great for the fish!!!
Here are my thoughts summarized into a “pro” and “con” list. I love these kinds of lists, hopefully you do to. It will allow you to quickly glean from my experiences:
Pros:
- Includes all hardware and instructions (this is NOT always the case with many manufacturers)
- Tight and strong rope.
- Includes zig-zag cleat (they best type of cleat for secure anchoring)
- Stainless steel metal parts (great longevity, very durable).
- Zero-corrosion design.
- Uses the highly-acclaimed third-party-manufactured pulleys.
Cons:
- The rope isn’t entirely waterproof (cheaply replaced when/if need be).
- Carabiner design is minority inconvenient (I have looked beyond this due to the other “positives” of the kayak anchor kit overall).
CONCLUSION:

Boom! We have done it! You know everything you need to know about kayak anchor trolleys and why I am certain that I have found the Best Kayak Anchor Trolley on the market! These pieces of kayak fishing gear are highly essential to stabilizing your fishing kayak in instances of swift currents or strong winds.
The particular model showcased above is clearly the best choice for kayak anchor systems. This trolley anchor is not only durable but also includes all the hardware needed. Installation is a bit different than the “general” rules that we have provided above, but everything is mentioned in their instructions manual, and the combination of both of these resources will ensure that you know exactly what you are getting into and that you make a proper installation!! Of course, if you have issues, we are here to help!!!!!
Comments

Did you know that kayak anchor trolleys existed before you read this post? Do you see why they are such an important piece of kayak fishing gear? They are one particular item that can make a “day 1” impact on the amount of success, not to mention level of enjoyment, experienced by a kayak fisherman!
Do you have any personal experience using your kayak anchor trolley while out on the water? Be sure to share your feelings with us by posting below! We read and reply to every comment and absolutely love interacting with the kayak fishing community!
Would have been nice to include a video of the installation procedure.
Hi Steven!
Totally agree with you here! We are working on getting a video uploaded, so you might circle back. We agree that it can be kind of confusing to put into words. For such an awesome kayak fishing accessory, its kind of hard to describe the installation process without a video!!
Check back soon!
-DS